Fun with Factoring

29 March 2012
Factoring ... fun?  Today it was!  We had a three-part math lesson on factoring and prime factorization today.  We did a great hands-on lesson from my newest math resource - Zeroing in on Number and Operations (check out the link at the bottom of my post).

We've been working on prime and composite numbers, and factors and multiples this week (I've got some FABULOUS foldables to share with you on Sunday).

Today we started with reviewing the definitions for prime and composite numbers, factors, and prime factors (we used our foldables from the week for this).  We then used the smartboard to roll the dice to form a two-digit number and list the factors for the number.


For the minds-on part of the lesson we examined the numbers and shapes I had taped to the board.  The students observed that they were all examples of prime numbers.
I then showed them a paper bag that I had written a number on (I started with 10).  I asked the students how many shapes I had in the bag if the bag had a product of 10.  Right away the students were able to answer "two shapes".  The shapes had a value of 2 and 5.  The funny thing was, even though the students were multiplying the numbers together to get 5 x 2 = 10, they kept saying "adding" instead of multiplying when justifying their answers (must FIX that immediately).  We repeated the concept for 28 and 50, which were more difficult numbers because each bag held 3 shapes (3 prime factors).  This part was done as a whole group activity.

We (I keep saying "we" because I'm part of a special PD team for three-part lessons.  Myself and another teacher (grade 2/3) team teach these lessons.  Over the course of the year we do 6 half-day lessons in my room, and 6 half-day lessons in her room) then divided the class into similar ability pairings and presented this question (and a bag with a product of 300 written on it).  Students worked together to find the answer.  Some students used a factor tree to find their answer and were finished quite quickly (I gave these students a second, much harder, number to work with if they finished quickly).  Other students worked through an "educated" guess and check strategy.  In the end, all students came to the correct answer, some just got there quicker than others.


We then grouped all the students' answers on the board for our bansho activity (to read more about the Bansho strategy, click HERE).  Basically, we had two groups for our bansho activity - students that used a factor tree to find the prime factors, and students who didn't.  While the pairs were working on their solutions, we circulate around the class recording questions we have for the students, or noting students whose strategies should be shared with the class.  Here are two examples of different strategies used by my students.  Do you see the green dots in the right hand corner of their papers?  When students finish a minds-on activity, they need to put a traffic light comprehension dot on the corner of their papers - green is for no problems, yellow is for some difficulty / questions, red is for a lot of difficulty / questions.  It's a quick and easy way to students to reflect on their work.


Students had an independent work sheet on this concept when we completed the activity (from the book at the top of the page).  They will hand in their work tomorrow (formative assessment) so I can plan from there.  But from what I saw today, I'm thinking (hoping) we'll see some great success.  I can't wait to use more activities from this book!  

Happy Thursday!!!  

21

Folding in Social Studies

25 March 2012
OK - it's not a Math Journal Sunday ... but I've got a FANTASTIC foldable to share with you today.  I saw this idea on A Teacher's Treasure a few weeks ago, and as soon as I saw it, I knew I HAD to do it with my class.  This is called the Secret Door Foldable.  You've got to head over to Mor's blog to see it - she even has a great video to show you step-by-step how to complete the template.  The minute I finished watching her video, I ran to get two pieces of paper to try it out for myself ... and then I had to get a few more pieces to make some for my girls.  Be sure to have some paper nearby ... I know you're going to want to try it, too.


We used the Secret Door Foldable for our culminating Social Studies project.  Our last unit was First Nations People and European Explorers.  I had students go through their notes and assignments, and choose the most important information (integrated the reading strategy of determining important ideas) to summarize on their foldable.  They also needed to organize their writing into paragraphs with subtitles.  Social studies mark - check, reading mark - check, writing mark - check!  PERFECT!!!


They drew a title page for the cover of the assignment.


They summarized their information on First Nations People on the inside foldable.  They also had to draw a picture or colour the background for visual appeal.  LOVE how this students added text features to his summary of information!


They then summarized their information for European Explorers inside the Secret Door.  They students LOVED this assignment, and it was so evident from the quality of their work.  Impressive!!!  A few of my students told me they had to make these foldable templates for their little brothers and sisters at home.  Too cute!


While you're visiting A Teacher's Treasure to see how to make these foldable templates (and I know you're going to), be sure to check out Mor's giveaway for tickets to the Everything's Intermediate Expo.  This expo is geared specifically to intermediate teachers and will focus on interactive notebooks (more foldables!!!), integrating technology, making math more meaningful, and more.  Check out the details HERE.


And, while I have your attention ... Krystal, from Lessons in the Middle, is having a Spectacular Spring Giveaway at her blog.  There are over $250.00 worth of prizes and materials in the giveaway (including my Fictional Narrative Writing Workshop Unit).  It gets even better - Krystal has a grab bag of products she'll send you just for entering her giveaway!!!  Check it out and find some time-saving materials by clicking on the button to the right.
30

Happy Birthday to ME!

23 March 2012
It's my BIRTHDAY!!!  When I got to school this morning, this was waiting for me at my desk.

One of my students from last year baked this for me.  LOVE her!!!


Feeling the love, I had to pull this out and wear it for the rest of the day ... because if you want to be treated like a princess for the day, you should definitely look the part.  ;)


And in ONE HOUR, I'll be sitting in a theatre waiting for THE HUNGER GAMES to start!!!  I can't think of a better way to spend my birthday!  Thanks for the birthday present, Lionsgate!  How will you top this next year ... Catching Fire, perhaps???

To celebrate this FABULOUS birthday weekend, I'm having a little sale at my TeacherspayTeachers and Teachers Notebook stores.  All my items will be on sale until Sunday.

Happy Friday, Happy Hunger Games, and Happy Birthday to ME!!!

18

"TIME" for Cootie Catchers

14 March 2012
Well, "time" is something I could definitely use a little more of.  How about you?  It's going on midnight here, but I'm determined to finish this up before I go to bed.  (Did I mention I still have to pack for our family mini-vacation tomorrow?)

I was doing a little marking of some math practice tests for our standardized testing (our testing isn't until the end of May / beginning of June).  And YIKES!!!  The concept of time is something my students definitely aren't getting.  I'm planning on doing a few more formal lessons, but I thought I'd make up some cootie catchers to add to our Friday math centres.  My class LOVES the cootie catchers, so I might as well capitalize on it, right???

This package contains 7 different cootie catchers:  an introduction to time, four for elapsed time (in varying degrees of difficulty to meet the MANY different levels in my classroom), one elapsed time word problems, and one for the 24-hour clock (a learning goal for my grade 6 students).  I've uploaded this product to my TPT Store and my Teacher's Notebook store.  You can click on the picture to the right to preview this at my TPT store.

And, if you're looking for a little more time ... I will email a copy to the first 3 people to leave a comment with their email address.

Happy Wednesday!  So looking forward to our mini-vacation tomorrow!  YAY!!!
20

Rainy Day - Crafty Day

12 March 2012
It POURED rain today - so much so that I can see some small patches of grass!  Could it be ... could Spring be on the way?  Oh, I hope so.  I may live in the land of ice and snow ... but I don't have to like it. ;)

Well, playing outside wasn't happening today, so we spent the day crafting (which I must admit, I totally prefer).  Do you remember these READ letters I made for my classroom this summer?  When I bought these letters, I also bought my daughters' initials.  I had planned to do something with them AGES ago, but they got lost in my craft clutter in the basement.  I found them a few days ago and knew exactly what I wanted to do with them.

I had a TON of buttons left over from making 100th day of school shirts for my girls, so we pulled out the buttons and the fun started from there.  And just because it's March Break, the learning doesn't stop at home.  My youngest girl was in charge of sorting colours, my middle girl was in charge of sorting by size, and my oldest was in charge of fitting the buttons on the letters.  I got stuck with the glue gun again.  But this time, I emerged unscathed!

LOVE them!


Happy Monday!!!


5

Math Journal Sundays

11 March 2012
YAY for Sundays!  The sun is shining (and hopefully melts some of the snow that was DUMPED on us this week), the kids are watching a movie, the coffee is good, and I've got a fun little craft planned for them this afternoon.  Best of all ... no planning for tomorrow - LOVE March Break!!!

We're still in our 3D Geometry / Measurement unit.  We've been studying the different 3D shapes and their attributes, and finding their volume and surface area.  In our last unit, 2D Measurement, I had been making shapes with the forumlas for area on them and posting them on the blackboard.  I decided to keep them up during this unit (to help them with surface area), and have been adding the 3D shapes they need to know the volume of.  These sit at the top of one of my blackboards (yes, I still have blackboards ... well, one blackboard - the others have all been covered because what I need more than anything else in my classroom is more wall space.)
photo of Formulas for area of 2D shapes
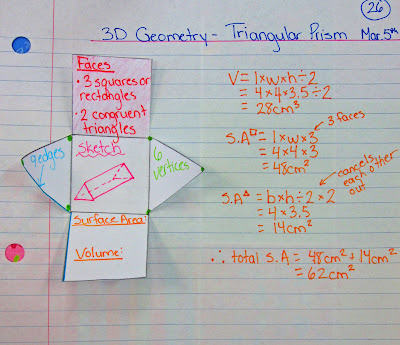
So, these are our foldables from this week - we made a triangular prism and a tetrahedron for our journals.  We wrote some of the attributes for each shape inside the nets (# of faces, # of edges, # of vertices, sketch, and surface area and volume).  As we did last week, we only glued one of the faces down so the net could still be folded into its 3D shape.
photo of triangular prism surface area and volume math journal entry @ Runde's Room
photo of square based pyramid surface area math journal entry @ Runde's Room

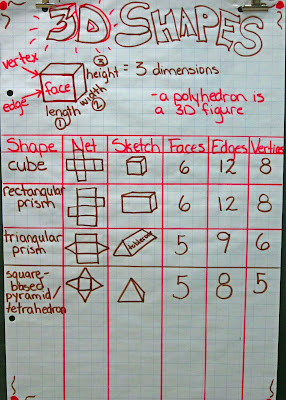
photo of 3D shapes anchor chart @ Runde's RoomWe also have an anchor chart we have been adding to as we study a new shape.  The students have also copied this chart into their math notes and are adding to it as we update our anchor chart.

Well, that's about it for today!  I'd love to hear if you're using math journals in your classroom, and what you include in your journals.  This is the first year I've done these interactive journals, and I'd love some more ideas / advice ...


Happy, Happy Sunday!  Looking forward to a GREAT day!


Looking for more "fantastic foldable" ideas???  Laura Candler is having a linky party over at her blog, Corkboard Connections.    Come check out the great ideas already added, or link up to add some ideas of your own!!!  Just click the button to the left to join the party!

Have I already mentioned I LOVE foldables???


17

Friday Art Feature

09 March 2012
The end of our school day today marked the beginning of our March Break - YAY!!!  Looking forward to spending some time with my girls - should be a fun week of crafting, cooking, and playing.  :)

We had Play Day this afternoon, and I had the envious job of being the score keeper.  YAY again!  I was able to get a bit of laminating done, and got my newest art bulletin board up.

We've been working on this art over the last two weeks while my students have also been finishing their illustrations and stories for the book we're writing.  I needed an activity that they would be able to complete with little instructions, little assistance, and would keep them engaged for a while.  This activity was perfect!

We started by covering a piece of paper with pages from an old book (they thought I had gone crazy when I started tearing pages out of a book).  Students overlapped the pages in different directions to add a bit of visual interest.

We then used watercolours to paint the ground along the bottom of the picture.  Using watercolours allowed for the print to still be visible under the paint.


We then sketched a tree on the paper, and they painted the tree using heavy black acrylic paint.

We discussed the artist, Kandinsky, and I showed them pictures of his circle art.  I gave each student a page with circle outlines in all different sizes, and they had to colour the circles any way they wished.  Students glued the completed circles at the end of each branch on their trees.

For the last step, students cut extra images from scrapbook paper to add extra embellishments to their art projects.  I LOVE how these turned out!  They just make me so happy ... so much so I want to leave them up all year!!!


Happy FRIDAY!!!  


45

Math Journal Sundays

04 March 2012
Good SUNDAY Morning!  I've got a great little foldable to share with you today.  I had hoped to have a few to show you today, but because I was down and out with the flu and Thursday and Friday, I only have the one.  We had our unit test on Monday, so I started a new Geometry / Measurement unit on Tuesday.  I had originally hoped that I would be able to finish the unit in two weeks (so I could finish before March Break), but it looks as though I'll need another week after March Break (and so the hamster wheel continues ... sometimes I feel I'll never get off this wheel).

Anyhow, for this unit we are going to study the properties, nets, volume and surface area for the different 3D shapes my students are responsible for learning.  Tuesday I had the students working in pairs and small groups to complete a diagnostic place mat activity where they wrote down pictures, definitions, examples, and non-examples (Frayer model) for 3D shapes.  They are using this sheet as a title page for their unit.  Wednesday we moved on to cubes and rectangular prisms.

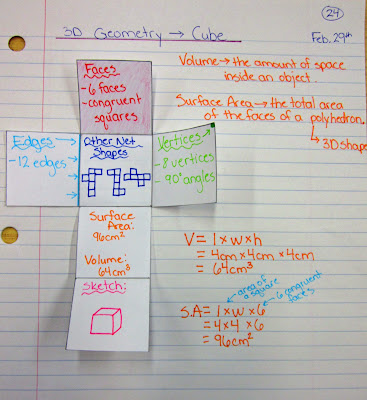
photo of cube volume and surface area math journal entry @ Runde's RoomI had students draw a net for a cube that had 4 cm x 4 cm faces.  Most of them remembered how to do this, and for the ones that were having difficulty, I showed them a model of a net for a cube.  (I have these fantastic large 3D shapes that have plastic removable nets inside them - LOVE them).  I was also modelling how to draw it under the elmo.  After the nets were drawn, we recorded different characteristics for the cube on each of the faces:  faces, edges, vertices, other net views, surface area and volume, and a sketch).  We then used the formula to find the volume and surface area of the net we had drawn.  We wrote this down on the paper beside the foldable.  We only glued one face to the paper (the one where "other net shapes" was written), so we could still "fold" our net into the 3D shape.  The students thought this was pretty neat.

photo of cube volume and surface area math journal entry @ Runde's Room
When all students had finished this task, I asked them to repeat the whole process, but this time for a rectangular prism.  I told them that 4 of the 6 faces should be 4 cm x 6 cm.  Most of them were able to draw the net with no problem, but I did circulate around the class to check in with those who were having some problems.  For the students that were struggling, I had them cut out their net and try to fold it.  When it didn't make a rectangular prism, I asked them how they could change their nets to make them "work".

I plan to have students continue to work on these this week - we will make a square-based pyramid, a triangular prism, and a triangular pyramid.  Come back next week to see the new pics.

Happy, Happy Sunday!!!


20

Snowed In ... What to Do ...

03 March 2012
Woke up today with a little more energy than I'd had in the last few days.  Someone was kind enough to give me the stomach flu last week, so I was down and out Thursday and Friday.  What did I do with all my extra energy today ... well, not much - we were snowed in today.  It snowed at least 40 cm last night, couple that with the plows going by, and well, let's just say we were going nowhere fast.  While my husband pulled out the snowblower, I settled myself down on the couch with a cup of coffee and thought about marking the math tests I've been lugging around for the past few days.  Let me say that again - thought about marking the math tests.  So, instead I opened up a shop on Teacher's Notebook.  I'm just starting to add some of my products, so it's still pretty bare.  I'd love for you to hop on over and take a peek - I could use a few "favourite shop" votes ... it's a pretty lonely place right now.  ;)


On another note, I've got a great foldable for you tomorrow on my Math Journal Sundays.  Be sure to check in.  I had wanted to post my fabulous art activity this week, but because I missed Thursday and Friday, I didn't get a chance to snap some pics of the finished products.  Oh well ... something to look forward to next week.

Happy Saturday night!

Jen
10