Math Journal Sundays - Culminating Mind Map

24 June 2012
Well, here it is ... our last math journal entry of the year.  I was so inspired by the fantastic mind maps I saw over at A Teacher's Treasure, I knew we had to try them for our culminating math journal entry.

I started out by showing my students the mind map pictures Mor shared on her blog (check out the link above).  They were WOWED!  I instructed the students to begin with the word MATH in the centre of the page, then draw long "branches" for each of our five strands:  Number Sense and Numeration, Geometry, Measurement, Data Management and Probability, and Patterning and Algebra.  The rest was up to them.  They had to go through their journals, and "place" each entry we have done over the year on the proper branch.  They were also to include images and colour to add interest to their mind maps.  This activity really got them thinking about all of the fabulous learning they have done this year.  Such a GREAT way to finish our journals.


Most of my students aren't quite finished yet, but this particular students was ... and it is FABULOUS ... so I wanted to share.  I love when the students finish a project like this, then stand back, and look at all we've done over the year.  I actually heard a few comments of amazement at all we've accomplished.

I've had quite a few questions from my followers about my math journals over the course of this year.  I've tried to answer most, but I know quite a few have gotten past me.  If you click on the picture to the right of this, I've organized all my math journal entries from the year in one place so you can look through them at your leisure.  Almost all of your questions are addressed in these posts.

I also plan on doing a Math Journal F.A.Q blog entry next weekend.

And lastly, (very excited about this one) I've just started working on a Interactive Math Journals product that will have information, templates, assessments ideas, and more.  This will be a HUGE project, so it will take me some time to complete, but I'm looking forward to spending a lot of time on it once school is out.  I did get the cover finished earlier this morning ... want a sneak peek of the cover?


Just 5 more days of school ... I'm starting to believe I actually may make it ... (hope I didn't just jinx myself).

Happy Sunday!!!


37

Daily 5 and CAFE for Upper Grades UPDATE

23 June 2012
I can't believe the response we've gotten for our Upper Grades Daily 5 and CAFE book study this summer!   As promised, I've got an update for you ...

We have a new blog!!!  We Read, We Blog, We Teach was created by Lorraine at Fabulous 4th Grade Froggies to host our book study.

We Read, We Blog, We Teach
Click on this button to check out our new blog and become a follower.  We have a schedule posted so you can get started on your reading.  The first book study posting will happen on July 1st - chapter 1 of the Daily 5.  Different bloggers are responsible for posting their ideas about the chapter and ideas to implement the strategies in your classroom.  You can get involved in the conversation by posting your thoughts and ideas below in the comments section.


We are so excited about this book study!  Go on over to the blog, check out our schedule, get out your Daily 5 and read the first chapter ... and get your questions and ideas ready for July 1st!


7

Friday Art Feature - Mingling with Monet

22 June 2012
YAY for Fridays!!!  This week was a CRAZY week, so I wanted to instill a little calmness into the classroom.  And what did I do to achieve that calmness, you ask?  Well, I broke out the paints, of course.  Paint used to be the one art supply I dreaded - paint meant mess.period.  However, I've been pretty impressed with how careful my students have been with the paint this year.  Yes, we still have messes ... but they have learned to take responsibility to clean up these messes, and sometimes I don't even know about the messes (even better).

With our provincial testing, year-end assessments, track meets, and everything else we squeeze into the last two months of school, I haven't spent much time on visual arts.  I missed it.  So we made up for it this week. Life is good again.

This week we were mingling with Claude Monet in art class.  I was inspired by a pin I saw on Pinterest and followed it back to the cutest project at The Crafty Classroom.  I love Monet's water lily paintings with the Japanese bridge - I even have a print in my bedroom.  So, when I saw this art project months ago, I knew we had to try it.

We started off by taping a bridge across our papers (I used heavy duty card stock - I prefer to use card stock when we are painting).  We only had masking tape to use, but if I do this project again, I will use painter's tape as I found the masking tape a little too sticky (and with the horrific humidity this week it was not a good combination).

We got out our painter's palettes (a paper plate) and using plain old acrylic paint from the dollar store, we started mixing greens and blues and yellows and just about any other colour they wanted.  (I had a picture of Monet's original projected onto the Smartboard so they could see what it looked like).

I instructed the students to use a medium sized brush, and just "dab" the paint onto the paper over and over - with the dabs overlapping.  They needed to "dab" right over the fence and pretend it wasn't even there.  I told them to mix their paints in a way that the bottom of the page was darker (a greeny-blue colour for the water), moving to a lighter greeny yellow for the top of the page (the sun poking through the trees).  When the paint had dried a bit, they went back and added some water lilies at the bottom (still using the dabbing technique).

The next day, once the paint had dried, we (carefully) removed the tape ... and stood back in awe of our masterpieces!  We added a little shading with some grey paint, and stood back to admire again!  Can you believe these were made by 10 and 11 year-olds?  FANTASTIC!!!


I'm linking up to Teaching With Style's Art With Aloha!  She made the cutest version of these with her younger kiddos!

20

Math Journal Sundays - Probability

17 June 2012
OK - this is a quick one today.  I want to spend the day with my family, and frankly, I'm not feeling that great - I have strep throat.  Yep, stayed healthy almost the whole school year, and now, with two weeks to go, I get strep throat.

We're trying to squeeze in probability before the end of the year.  My math journal from this week may not be the most original, but it was a great review for fractions, and a great way to activate their prior knowledge for probability.

I started out with the learning goal and task, which each student had to copy into their notebooks.  I also gave each student a circle, brad fastener, and paper clip to make the spinner.  They could consult with a partner, but each student was responsible for creating the spinner independently.

The students knew they had to divide the circle into ten sections, and they knew a circle has 360 degrees, so they used a protractor to divide the circle into ten 36 degree sections (great way to integrate all the strands we study).

The spinner is glued into the notebooks, but the paper clip was stretched out and hooked around the brad fastener so it is able to spin.


This was the same student's left-side thinking.  She rewrote the learning goal in her own words, and completed the "What I Know", "What I Learned", and "Proof" sections on her own.  For her reflection she used the spinner she created above, and actually carried out the experiment so she could compare the experimental and theoretical probability of the spinner.  LOVE it!!!


Happy Sunday, Happy Father's Day, and Happy 10 days left for me!!!


22

A Shirt and a Tie for Father's Day

14 June 2012
We made the cutest little Father's Day cards in class yesterday.  Had to get them done yesterday as we had our end of the year field trip today (took 67 kids to the movies, then the park for lunch, then bowling for the afternoon ... WIPED!), and we have a P.D. day tomorrow (some time to work on report cards - YAY!)

I made these cards for the first time last year - and they were a hit, so we did them again.  They turned out SO cute!  The shirt opens up (it tucks in under the collar), so students can write a personal message or poem to their father, step-father, grandfather, etc.
photo of origami Father's Day cards @ Runde's Room

To complete this activity you only need a piece of scrapbook paper ... that's it ... it's that easy.  I showed this video to my class, and we completed it step by step.  After each step shown on the video, I paused the video and showed the step under the ELMO.


Happy Father's Day (on Sunday) to all those FABULOUS fathers out there!
10

Word Walls and Crystal Balls

12 June 2012
Word Walls and Crystal Balls ... can you tell we were discussing rhyme schemes in poetry today?  Anyway, this post has nothing to do with poetry ... just wanted to intrigue you with the title.  Did it work?

photo of Upper Grade Word Wall @ Runde's Room
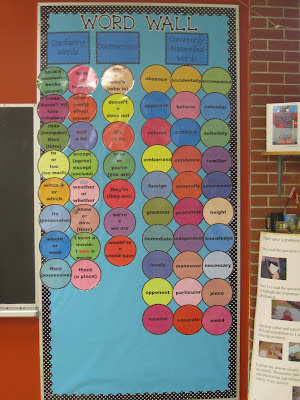
Lately I've been reflecting on my word wall.  I LOVE my word wall, and LOVE how it looks in my room, but I don't think I've done enough to make my students interact with it this year.  They're not using it as much as they should ... and I'm seeing spelling mistakes that they just shouldn't be making.  So I decided to do something about it.  Given my students obsession with my cootie catchers, I decided to make a package of cootie catchers designed to get them to interact and USE the word wall.  I'm going to hang an envelope on the word wall, and stuff it full of cootie catchers.  Every few weeks, when we have a few extra minutes, I'm going to get my students to pair up and grab a cootie catcher (I have 7 different ones in the package) to practice and actually USE the wall.  Hopefully, those little mistakes that drive me crazy will start to vanish.

You can click on the picture below to take a peek at my newest set of cootie catchers.
photo of Word Wall Cootie Catchers @ Runde's Room


OK - so on to the crystal ball.  This is a product I've been working on for a while - all the page linking and animating took quite a bit to complete.  I wanted a SMARTboard lesson with a little WOW factor for the students, and I wanted it to be self-correcting so I could use it as a language center next year (already thinking about my working with words centers for the Daily 5 next year) if I was conferring with another student.  I made this lesson to practice synonyms and homonyms (getting a little extra vocabulary in, too).  You can click on the image to the right to preview it at my TPT store, but you can also take a peek at how it works on the video below (I've just recently starting using the movie capture tool with the notebook software).  I'd like to make more language centers with this same crystal ball template - I'm thinking parts of speech may be next ... what do you think?  Any ideas?


Happy Tuesday!!!
8

Math Journal Sundays - Fractions

10 June 2012
I've got two great math journal entries to share with you today, both about fractions.  With the end of the year in sight, our math journal entries will be coming to end soon, too.  These math journals have been my favourite addition to my classroom this year - hands down.  I'm so excited to be able to provide my students with a tool they can keep using for years to come.  We've got a highschool co-op student at our school right now, who just happens to be a graduate of our elementary school.  One day at lunch she told me how much she appreciated the math notecard system we used when she was in my class - she said she was able to use it as a reference for years - even into her highschool math classes.  I told her she had to stop by my class and see our new math journals - same kind of valuable reference tool, but so much more interactive.

photo of Fraction math journal entry @ Runde's Room
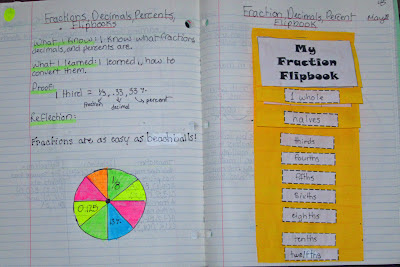
Anyhow ... my first entry to share with you today is our fraction flipbook - focusing on converting fractions to decimals and percents.  I got my inspiration for this from this pin on pinterest - a fabulous idea from Buzzing with Mrs. B.  We cut 10 pieces of paper at various lengths to make this flipbook and stapled the pages together at the top.  I made a quick handout for each student that had 9 boxes for the labels, 9 circles and 9 rectangles for drawing the fractions, and 9 tables that had fraction, decimal, and percent sections.  Students cut out all the pieces and glued them into each section.  We did two sections together, and then the students were responsible for finishing the book independently so I could assess for understanding.

photo of Fraction math journal entry @ Runde's Room


We also completed a left-side of the page thinking for this entry, where students discuss what they already know, what they learned, proof, and a reflection.  Do you see the yellow dot in the top left corner?  This is our traffic light comprehension - students give a green dot if they found the concept easy, yellow for some difficulty, and red for a lot of difficulty.  We use our traffic light comprehension dots on our group work during our three-part lessons in math, but I hadn't thought of adding them to our math journals until now.  This gives me a quick way to see what students may need a little extra help with this lesson or concept.  Can't believe I didn't think of adding it to my journals until now - LOVE how the journals keep evolving this year!
photo of Fraction math journal entry @ Runde's Room


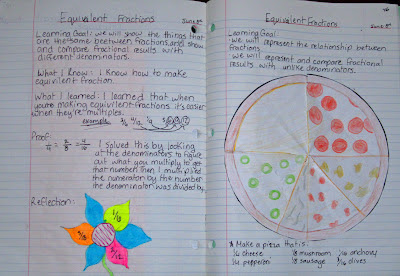
photo of Fraction math journal entry @ Runde's RoomOur second journal entry focused on Equivalent Fractions.  I've been using pizza fractions for years (and judging from the amount of pins on pinterest, so has everyone else).  ;)        I gave each student a circle and had them draw a smaller circle around the edge to make a crust for the pizza.  We then folded our circle into sixteenths.  I gave students the learning goal and instructions to make the pizza:  1/4 cheese, 1/4 pepperoni, 1/8 mushrooms, 1/8 sausage, 3/16 green olives (or alligator nostrils as my four-year old calls them), and 1/16 anchovies (had to get something in there to "gross out" my plethora of boys in the class).  We discussed that 2/8 equaled 1/4, and 2/4 equaled 1/2, and so on ...
photo of Fraction math journal entry @ Runde's Room

We then cut along the fraction lines and peeled back the sections so we could practice our converting to decimals and percents (still working on that concept from last week).


We also completed a left side of the page thinking for this entry.  I completely forgot to remind the students to add a traffic light comprehension dot to their page this time ... I think I'll get them to do that before I invite a student to share his or her journal entry as our review on Monday.
photo of Fraction math journal entry @ Runde's Room


We also had some fun using my Fraction Cootie Catchers - such a fun way for partner review.  At this time of year, (and with the sun shining outside) I've got to pull out all the stops to keep my students engaged.  And I loved "eavesdropping" on the various conversations around the room.  When a partner got the answer wrong, the other partner had to "teach and explain" how to find the correct answer.  You can click on the picture to see this product at my TPT store.


Hope you are all having a fantastic weekend - it's hot and sunny here today, so we'll be making some homemade popsicles to enjoy while wading in the kiddie pool this afternoon.

Happy Sunday!!!


21

We've Got Rhythm

05 June 2012
We've got some rhythm going on in our classroom right now!  OK - so maybe we're not dancing around the classroom yet - but considering I've still got over three weeks to go, that could be a good thing.

I made these rhythm cards years ago, and use them every year when I teach music.  Each card represents one beat of music, and each stick is one syllable (or clap).  The words are pronounced and clapped just like they would be said in every day talking - so, penguin has two equal parts, mud turtle has the emphasis on the first syllable, elephant has the emphasis on the last syllable, etc.  But because each card is only ONE beat, the four (equal) syllables for salamander must be done in the same time it would take for the one syllable (clap) for bear.  Did I explain that well enough?  (I know many of you that teach music use the "ta ta" or "ti ti", but I like using these words because it ALWAYS works with my classes.


I've added a magnet to the back of each card so we can use them on the black board or any magnetic surface.

We started by practicing a few patterns as a whole class - because the cards have magnets on the back, it's easy to switch them around.  I also introduced the one beat rest (quarter rest).  We talked about a measure of music (the number of beats in a bar), and worked with some 4 beat measures (a 4/4 time signature).

We also had a lot of fun figuring out what rhythm patterns our names were - mine (Jennifer) would be an elephant ... figures <sigh>.


I keep my rhythm cards in baggies with about 10 - 15 cards in each baggie.  I divided my class into groups, and let each group make a few rhythm patterns to practice.  They got to perform (by clapping) their rhythm patterns for the class.


I then invited each group up to the black board to start making a large rhythm pattern with 4 beat measures. Each group came up and added to what the previous group had done.  Before a new group could add their cards, they had to clap the rhythm pattern already made on the blackboard.


At the end we had a WHOLE SONG!  A whole song composed by my class.  FABULOUS!!!  We practiced it a few times, had a few laughs, and practiced it a bit more.

Tomorrow we are going to integrate our poetry writing by creating a rap to go along with our rhythm pattern - I did stress that only appropriate lyrics will "fly", but I'm not that nervous ... it's going to be so much fun!  I'm going to record their raps on my iPad - watch out, Grammys ... here we come!
7

Musical Note Poetry

02 June 2012
As it was our testing week this past week, I tried to keep our activities light and fun.  However, I am starting to stress about getting it all in before the end of the year.  The key to this will be integration!  We made great little musical note poems this week to integrate our poetry writing with our music unit.  The students had a lot of fun with them, and they turned out beautiful!  I can't wait to make a fabulous display out of them when all the students have finished.
Musical Words - words using the staff notes @ Runde's Room
My students were already pretty good at identifying notes on the staff, so after a quick review, I let them work in pairs to create as many "musical" words as they could - using the letters from the music notes:  C, D, E, F, G, A, B.

They also had to write the notes for all of the words they found.  This picture shows just some of the words the students found.


photo of Musical Poetry assignment poster @ Runde's Room


This was our anchor chart showing our learning goal and success criteria.

Students needed to write a poem that had at least 2 quatrains, a rhyme scheme of their choice, and a pleasing rhythm.  They needed to include at least 8 "musical words" - one per line.


I printed off an image of sheet music I found, and we used tea bags to give the sheet music an antique look.  This was used for our background frame to mount our poems on.


These are two of our finished products!!!  LOVE them!  When all the students finish, I'm going to make a bulletin board display on black paper ... and I think I have a music border in one of my cupboards ...


I'm working a little product right now to integrate my music unit with my math unit on fractions - hoping to finish it this weekend so I can get my students working on it early this week.  This month is going to FLY by (thank goodness!!!)


Happy Saturday!  It's a dreary one here, but I'm excited to get to some baking with the rhubarb from my garden.  I think there's a strawberry rhubarb crumble in our future tonight!
14